There are 3 roughing mills, 4 middle rolling mills and 8 finishing mills for a hot rolling small bar line. The FC4462192 bearings used in the middle rolling mill are lubricated by grease. Recently, the frequent fracture of the inner ring has seriously affected the normal production of the workshop. For this reason, the steel mill has also organized the technical personnel of the factory and bearing manufacturers to jointly find the cause of bearing damage on the site. The picture of bearing damage on the site is as follows:

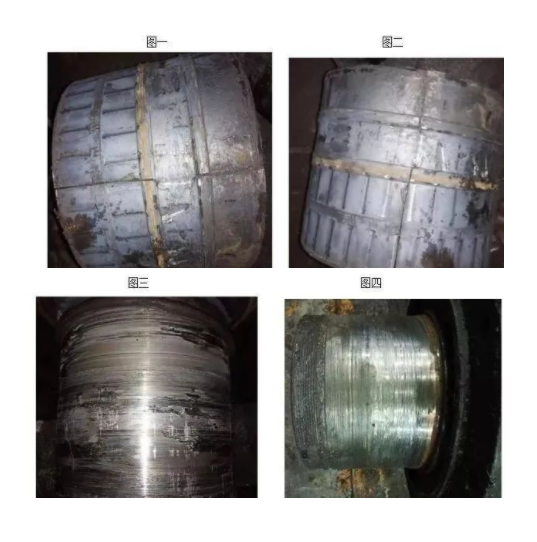
Figure 1 and Figure 2 are pictures taken from different angles of the same inner ring, which is a typical part of the damaged inner ring on the site. A longitudinal crack can be clearly seen from the surface of the damaged bearing. This damage phenomenon is caused by three reasons:
1) Roll diameter exceeds the standard tolerance too much, the standard roll diameter size tolerance is φ220p6 (+0.079+0.05), roll diameter *** maximum interference tolerance can not exceed 0.08mm, bearing inner diameter tolerance will be guaranteed in the range of φ220 (-0.02 to -0.03) during processing, Bearing inner diameter tolerance of roll diameter *** The sum of large tolerance is 0.10mm, if the interference exceeds 0.10mm, the inner ring online use will appear cracking phenomenon.
2) The size tolerance of the roll diameter is less than the standard tolerance. When the inner ring is installed on the roll diameter, there is not enough interference to ensure the concentric rotation of the inner ring and the roll, and the failure to concentric rotation will inevitably make the inner ring and the roll diameter creep, which is also an important reason for the inner ring cracking.
3) The straightness of the roll diameter surface does not meet the requirements (there is uneven phenomenon on the roll diameter surface), which is common in the old roll (the roll that has not reached the scrap standard).
FIG. 3 and FIG. 4 are the rolls used in the inner rings of FIG. 1 and FIG. 2, and the pictures reflect the roll diameters on both sides of the rolls. It is known on site that the roll has been used for many times, and the test data of the roll diameter on site are as follows;
Figure 3 Test data: φ220 (+0.04+0.05-0.05), where +0.04 is near the roll side, +0.05 is the tolerance of the middle part of the roll diameter, and -0.05 is the outer tolerance.
Figure 4 Test data: φ220 (+0.02+0.03+0.05), where +0.02 is near the roll side, +0.03 is the tolerance of the middle part of the roll diameter, and +0.06 is the tolerance of the outer part of the roll diameter.
The straightness of the surface of the roll diameter was detected by the light gap method, and the convexity of the surface of the roll diameter was visually measured at more than 0.10mm.
According to the measurement data of roll diameter and the comprehensive analysis of concavity, the reason of the crack phenomenon in the inner ring can be determined as too small interference and the concavity of the surface of the roll diameter. For other roll diameter detection on site, there are many rolls with similar working conditions on site.
In view of the above conditions, it is recommended as follows:
1) A sampling inspection system shall be established before the newly purchased rolls are put into storage, and unqualified rolls shall be prevented from being put into storage. Roll dimensional tolerance shall be implemented according to the national standard: φ220p6 (+0.079+0.05).
2) The outer diameter micrometer should be used to detect the diameter interference tolerance of the roll with the new inner sleeve each time the roll gets off the machine, and the interference tolerance cannot meet the requirements to replace the new roll or repair the roll.
3) The used roll diameter should also focus on detecting the straightness of the surface of the roll diameter, using the light gap method.
4) The size tolerance and straightness of the repaired roll diameter should be tested.
5) In order to ensure that the interference quantity meets the requirements, the bearing inner diameter dimension tolerance should be controlled at φ220 (0 to -0.030).