Preface Backing bearings, as the core components of multi-roll rolling mills, especially 20-roll rolling mills, are installed in groups on the core shaft as support rolls. They have high requirements for individual and group precision. The maximum and minimum H values of the same group of backing bearings should not exceed 0.006m, and the H values of adjacent bearings should not exceed 0.002mm. However, with the increase in the number of on-machine uses and other equipment failures, It often leads to problems such as uneven wear of the outer diameter of the bearing, damage to the outer diameter, and changes in the H value. Therefore, it is necessary to ensure that the bearing has a certain level of usage accuracy through the daily grinding of the backing bearing.
1. Cleaning
Conduct a preliminary cleaning of the bearings to be ground, mainly to remove surface oil stains, to facilitate subsequent inspection steps.
2. Preliminary inspection and measurement
Check whether there is any obvious damage to the inner and outer diameters of the outer ring, such as broken bands, scratches, edge peeling, and indentation extension. Check for obvious damage to the outer diameter of the inner ring, with a focus on inspecting the surface condition of the force-bearing area. Check whether the rolling elements have any obvious damage, such as end face scratches or surface spalling. Check whether the cage is deformed or if there are any problems with the rolling elements of the card block causing rotation stagnation. Select the obviously damaged bearings. (If they cannot be reused after inspection, they need to be replaced.) As shown in the following figure:

Measure the runout of the bearing and the T-value status to ensure that the numerical variation of the bearing is within the repairable range.
3. Temporary numbering: Remove the inner ring of the bearing and the rolling element assembly. Pay attention that the position and sequence of the inner ring and the rolling element assembly of each set of bearings must not be confused. They need to be restored to the corresponding outer ring in their original state.
4. Outer ring grinding: When using a horizontal grinding machine, a dedicated fixture or CNC vertical grinding machine should be equipped to grind the outer diameter of the bearing outer ring. Note that before grinding, the outer ring with more severe outer diameter damage should be ground first to determine the final grinding size of the entire set.
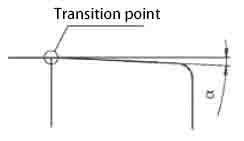
5. Outer ring chamfering grinding: To prevent abnormal wear and roller marks caused by stress concentration between the outer ring chamfering and the two intermediate rollers of the twenty rollers, the bevel chamfering of the outer ring is a key factor. It is usually set at a width of 15-25mm and an Angle of 0°15 '-20', with a smooth transition at the junction with the outer diameter. After the grinding is completed, a secondary polishing treatment is required at the transition junction.

6. Cleaning and assembly: After secondary cleaning and drying treatment, the bearings are assembled. Due to the different wear conditions of the rolling elements and the corresponding inner and outer ring raceways, it is essential to ensure that the positions and sequences of the inner ring of the bearing and the rolling element assembly are not confused. They need to be restored to the corresponding outer ring in their original state.
7. Measure the runout of the bearing and record the T value. For repaired bearings, follow the H value requirements of the same group of backing bearings, with the maximum and minimum difference not exceeding 0.008m, and the H value of adjacent bearings not exceeding 0.003mm or the value required by the customer.
8. Rust prevention, packaging and warehousing.